You could master every blending technique on the internet, invest in the best eyeshadow palettes, and follow your favorite tutorial step by step - and the result might still look nothing like what you expected. That is not a skill problem. It is an eye shape problem.
The same cut crease that opens up deep-set eyes can completely disappear on hooded lids. The same winged liner that lifts downturned eyes can make upturned eyes look startled. Eye shape is the single biggest factor that determines which techniques actually work for you, yet most tutorials assume one generic eye shape fits everyone.
This guide breaks down the eight most common eye shapes, explains how to identify yours, and gives you specific techniques for eyeshadow placement, liner, and lashes that are designed for your anatomy - not someone else's.
Get personalized eye makeup looks with BeautySparkHow to Identify Your Eye Shape
Identifying your eye shape takes about 60 seconds. Stand in front of a mirror in good lighting, look straight ahead, and answer these four questions:
1. Can you see your crease? Open your eyes naturally and look straight at the mirror. If you can see a visible crease above your lash line, you have a creased eye shape (almond, round, upturned, downturned, deep-set, or prominent). If the crease is hidden or barely visible when your eyes are open, you have hooded eyes or monolids.
2. Do you see white above or below your iris? If you can see white space above your iris (between the iris and your upper lid), you likely have round eyes. If white is only visible on the sides, you may have almond eyes. If white shows below your iris, that can also indicate round or prominent eyes.
3. Do your outer corners tilt up or down? Imagine a straight horizontal line from the inner corner of your eye to the outer corner. If the outer corner sits above this line, your eyes are upturned. If it sits below, they are downturned. If the corners are roughly level, move on to the next question.
4. How prominent are your eyes? Close one eye and gently touch your eyelid. If your brow bone juts out noticeably and your eye sits further back in the socket, you have deep-set eyes. If your eyelid feels like it pushes forward beyond your brow bone, you have prominent eyes.
Most people will have one dominant eye shape, though it is perfectly normal to have a combination - for example, hooded eyes that are also slightly downturned. In those cases, blend techniques from both categories.
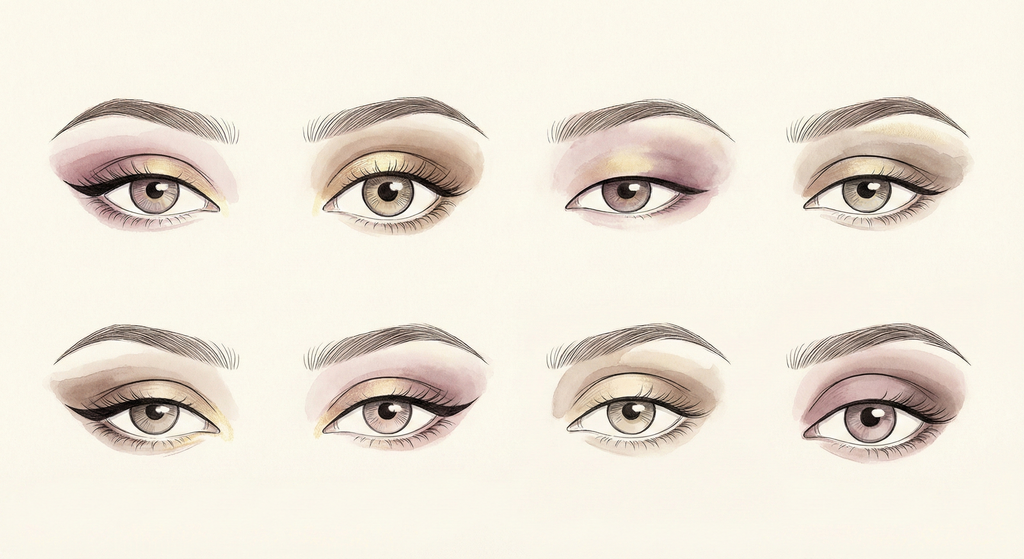
The 8 Eye Shapes
Almond Eyes
What they look like: Almond eyes are the most balanced eye shape. They are wider than they are tall, with a visible crease and slightly tapered outer corners. The iris is partially covered by both the upper and lower lids, creating a smooth, oval-like appearance. When you look straight ahead, little to no white is visible above or below your iris.
Best techniques: Almond eyes are incredibly versatile, so nearly any technique works well. For a classic everyday look, apply a medium-toned transition shade in the crease, a slightly darker shade on the outer corner in a soft V shape, and a shimmering highlight on the center of the lid. Winged eyeliner is your best friend - follow the natural upward angle of your lower lash line to determine the wing direction. You can go thin and precise for daytime or thick and dramatic for evening.
Common mistakes: The most common mistake with almond eyes is overcorrecting. Because almond eyes are already balanced, overly dramatic techniques (very thick liner all around the eye, heavy dark shadow on the entire lid) can make them look smaller instead of enhancing their natural shape. Keep your heaviest color on the outer third.
Hooded Eyes
What they look like: Hooded eyes have a fold of skin that droops over the crease, partially or fully hiding the mobile lid when your eyes are open. You might have plenty of lid space when you close your eyes, but when you open them, most or all of it disappears under that fold. Hooded eyes are one of the most common eye shapes and become more pronounced with age.
Best techniques: The key with hooded eyes is to bring your shadow work higher than the actual crease so it stays visible when your eyes are open. Apply your transition and crease shades above your natural crease line, blending upward toward the brow bone. Look straight into the mirror while applying to see exactly where color needs to sit. For eyeliner, a thin line close to the lash line is more effective than a thick band, which will vanish into the fold. Bat-wing liner (where you draw the wing shape with your eyes open) works better than a traditional flick. Curling your lashes and using waterproof mascara helps prevent the hood from pressing them flat.
Common mistakes: Applying shadow with your eyes closed and then opening them only to find all your work is hidden. Always check placement with your eyes open. Another mistake is giving up on winged liner - it absolutely works on hooded eyes, but you need to draw it while looking straight ahead so the wing stays visible above the fold.
Monolid Eyes
What they look like: Monolid eyes do not have a visible crease at all. The eyelid is smooth and flat from the lash line to the brow bone, creating a wide, open canvas. Monolids are most common in people of East Asian descent but appear in all ethnicities. The lid space is generous, making them ideal for bold, graphic looks.
Best techniques: Because there is no crease to guide placement, you create your own dimension. Gradient shadow looks work beautifully - apply the darkest shade along the lash line and blend upward into progressively lighter shades toward the brow bone. Graphic liner is a monolid superpower. Bold, thick lines, double wings, floating liner, and colorful graphic shapes all look striking because the smooth lid surface shows off every detail. Tight-lining (applying liner to the waterline or between the lash roots) helps define the lash line without eating up precious lid space. Individual or cluster false lashes open up the eye without the heavy band of strip lashes weighing down the lid.
Common mistakes: Using techniques designed for creased eyes. A traditional cut crease or a "shade in the crease" approach does not translate to monolids because there is no crease to guide placement. Instead, focus on lash-line-up gradients and graphic elements that celebrate the smooth lid shape.
Round Eyes
What they look like: Round eyes are large, open, and circular - the height and width are nearly equal. When you look straight ahead, you can usually see white space above and/or below your iris. The crease is visible and often quite curved. Round eyes give a naturally youthful, wide-awake appearance.
Best techniques: To add definition and sophistication to round eyes, focus on elongating them horizontally. Apply a deeper shade to the outer corner, extending it slightly past the outer edge of your eye rather than packing it straight above the pupil. Winged liner is fantastic for round eyes - extend the wing outward at a flatter angle to stretch the eye shape. Concentrate the thickest part of your liner at the outer third of your lash line and keep it thinner on the inner half. For an extra elongating effect, apply a touch of dark eyeshadow or liner along the outer third of your lower lash line and smudge it outward.
Common mistakes: Lining the entire eye with a thick ring of eyeliner. This actually emphasizes the roundness rather than balancing it. If you want to line the entire eye, keep the line ultra-thin on the inner half and gradually thicken it as you reach the outer corner.
Upturned Eyes
What they look like: Upturned eyes have outer corners that sit higher than the inner corners, creating a natural "cat eye" lift. This eye shape is sometimes described as "exotic" or "feline." The lower lash line often has a visible upward sweep at the outer edge. When you draw an imaginary line from inner corner to outer corner, the outer corner clearly sits above it.
Best techniques: Your natural shape already has a built-in lift, so lean into it. Eyeshadow looks that concentrate color on the outer upper corner enhance the upward sweep beautifully. A classic smoky eye that lifts outward and upward follows the natural direction of your eyes. For liner, a kitten flick - a short, subtle wing that follows your natural lash line angle - looks effortless and polished. You can also balance the upward tilt by adding a slightly darker shade or smudged liner along the outer third of your lower lash line to bring some visual weight downward.
Common mistakes: Extending winged liner at too steep an upward angle. Your eyes already tilt up, so a very dramatic upward wing can look exaggerated. Aim for a wing angle that is roughly parallel to your lower lash line or even slightly flatter than it.
Downturned Eyes
What they look like: Downturned eyes are the opposite of upturned - the outer corners sit lower than the inner corners, giving the eyes a gentle, drooping appearance. The outer portion of the upper lid may feel heavier or seem to pull downward slightly. Downturned eyes often convey a soft, approachable, slightly melancholic look.
Best techniques: The goal is to lift the outer corner visually. Apply your deepest eyeshadow shade at the outer corner, but angle it upward toward the tail of your brow rather than following the natural downward slope. Winged liner is your secret weapon: draw the wing at a sharper upward angle than your natural lash line to counteract the droop. Keep liner thin or skip it entirely on the outer third of your lower lash line, because lining that area emphasizes the downward pull. Concentrate lower lash liner on the inner two-thirds instead. False lashes that are longest at the outer corner add an extra visual lift.
Common mistakes: Following the natural downward angle when applying shadow or liner. This makes the drooping more pronounced rather than correcting it. Always lift. When applying shadow, imagine an invisible line from the outer corner up to the end of your brow and keep all your outer-corner color above that line.
Deep-Set Eyes
What they look like: Deep-set eyes are positioned further back in the skull, beneath a prominent brow bone. This creates natural shadow and depth around the eyes, which can make them look smaller or more recessed. The crease is often deep and well-defined, and the brow bone protrudes noticeably. Deep-set eyes tend to have a naturally sultry, intense look.
Best techniques: Your eyes already have built-in depth and shadow, so the goal is to bring them forward and open them up. Use light, shimmery shades on the mobile lid to catch light and make the eyes pop. Apply a medium transition shade sparingly in the crease - deep-set eyes already have a shadow effect in the crease, so going too dark there will make them look even more sunken. Highlight the inner corner and the center of the lid with a champagne or gold shimmer. Keep your darkest shade along the lash line as a liner rather than packing it into the crease. Avoid dark shadow on the brow bone entirely, as this adds even more depth to an already recessed area.
Common mistakes: Going too dark in the crease. This is the most common and most impactful mistake for deep-set eyes. Your brow bone already casts a natural shadow, so adding dark eyeshadow to the crease doubles the shadow effect and makes your eyes look like they are receding into your face. Keep the crease shade medium-toned and blend it well above the crease line.
Prominent Eyes
What they look like: Prominent eyes (also called protruding eyes) are the opposite of deep-set. The eyelids and eyeballs project outward from the eye socket, making the eyes appear large and forward-facing. The brow bone is less pronounced, and the lids have plenty of visible surface area. Prominent eyes are naturally attention-grabbing and work beautifully with makeup that adds definition.
Best techniques: The goal is to add depth and definition to push the eyes back slightly and create a more sculpted look. Matte, medium-to-dark shades are your best friends - they visually recede, which counteracts the forward projection. Apply a matte medium shade across the entire lid and build a deeper matte shade into the crease and outer corner. Smoky eyes look gorgeous on prominent eyes because the layered dark shades add dimension. Eyeliner along the upper lash line, kept to a medium thickness, frames the eye beautifully. You can also line the waterline with a dark pencil to define the shape and make the eyes appear slightly less prominent.
Common mistakes: Using too much shimmer or glitter on the center of the lid. Shimmery, reflective textures catch light and make surfaces look like they are coming toward you - which is the opposite of what you want with eyes that already project forward. Save shimmer for the inner corner highlight and keep the rest of the lid matte.
Get Eye Makeup Looks Designed for Your Eye Shape
BeautySpark analyzes your eye shape, color season, and face proportions to recommend looks that actually work for your unique features.


Combining Eye Shape + Color Season
Your eye shape tells you where to place makeup. Your color season tells you which colors to use. When you combine the two, you get makeup looks that are tailored to your face in every dimension.
For example, if you have hooded eyes and you are a Soft Autumn, you know to apply your shadow above the natural crease (eye shape guidance) in warm taupe, dusty peach, and muted bronze tones (color season guidance). A Dark Winter with round eyes would focus on elongating the outer corners with sapphire, deep plum, and charcoal shades.
This is exactly the approach BeautySpark takes. The app analyzes both your eye shape and your color season, then generates custom makeup looks that account for both. Instead of guessing which tutorial will translate to your face, you get recommendations built specifically for your anatomy and coloring.
Here are a few powerful combinations to try:
- Hooded eyes + Bright Spring: Use vivid coral on the outer corner blended above the crease, with a bright gold shimmer on the center lid.
- Monolid + True Winter: Try a bold graphic liner in sapphire blue, with a clean fuchsia gradient from lash line to mid-lid.
- Deep-set eyes + Light Summer: Apply a champagne shimmer across the lid, with a soft dusty rose in the crease and lavender on the outer corner.
- Prominent eyes + Dark Autumn: Layer matte burgundy across the lid, build forest green into the crease, and line the waterline with dark bronze.
The point is not to memorize a list of combinations. It is to understand the two principles - placement from your eye shape, color from your season - and apply them together for every look you create.
Quick Eye Shape Tip
If you are not sure about your eye shape, take a selfie looking straight at the camera in even lighting. Compare your photo to the descriptions above. It is much easier to analyze your eye shape from a photo than from a mirror, because you can look at the image objectively without squinting or adjusting your expression.
Your Eyes, Your Rules, Your Perfect Looks
Download BeautySpark to get AI-powered eye makeup recommendations tailored to your exact eye shape and color season. No more guessing which techniques will work for you.