The fix for makeup for hooded eyes is two changes: place your color and definition slightly above the natural crease, and apply with your eyes open. A hood folds down over the lid, so shadow blended into the real crease disappears the moment you look ahead. Float a soft matte mid-tone just above the hood instead, and pick shades that suit your coloring so the work flatters as well as shows.
Get a personalized eye makeup tutorial matched to your color seasonWhy Hooded Eyes Hide Your Eyeshadow
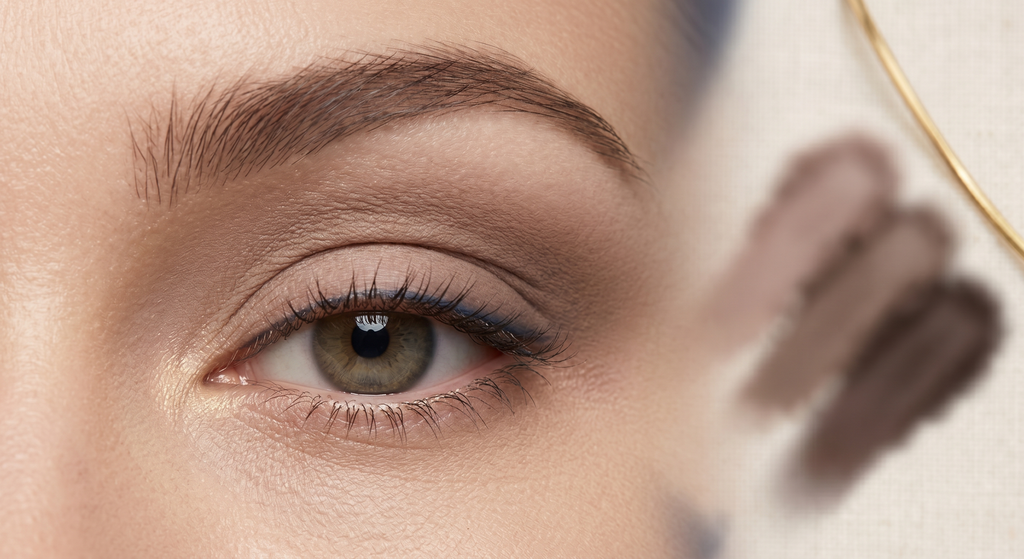
A hooded eye has an extra fold of skin that drops from the brow bone over part of the upper lid. Sometimes it runs in the family, and sometimes it develops with age as the eyelid skin loses elasticity, a change ophthalmologists call dermatochalasis. Either way, the visible mobile lid is smaller than the lid you actually have, and a chunk of your eyeshadow real estate sits hidden under the fold.
That is the whole problem in one sentence: when you apply shadow in a mirror with your eyes relaxed or half-closed, you are decorating skin that folds away the instant you open your eyes. The crease you carefully shaded vanishes into the hood. The lid color you patted on gets covered. You look in the mirror and wonder where it all went.
The standard advice you read everywhere, blend in the crease and build the outer V, assumes a visible socket line that stays put. On a hooded eye it does not. So the techniques in this guide do two things differently: they lift the placement up to where your eye stays open, and they keep finishes flat where the fold would otherwise catch the light and exaggerate it. None of this is harder than a regular eye look. It is the same steps, moved a little higher and checked in a different mirror position. For a refresher on the general zones first, our eye shapes guide helps you confirm you have hooded eyes before you start.
On a hooded eye, color blended into the real crease disappears under the fold, so every placement has to move up to stay visible.
Map Your Lid With Your Eyes Open
This is the make-or-break step, and it takes about ten seconds. Sit the mirror flat in front of you at eye level rather than tilting your chin down to a vanity mirror. Look straight ahead with your eyes fully open. Now watch where the fold of the hood rests against your lid. The line where the skin folds is your reference point, and it sits lower than the crease you would feel if you pressed along the socket with your eyes shut.
Mark a "new crease" just above that fold. You are not drawing on a literal line, you are deciding where your transition and definition will live so they clear the hood when your eyes are open. A good way to find it: with eyes open, use a clean brush handle to gently rest where the hood ends and the skin above it stays exposed. That exposed strip above the fold is your working zone. Everything in the rest of this guide keys off it.
Keep checking with your eyes open as you go. Close them to apply if you need to steady the brush, but open them again after every pass to confirm the color is landing above the hood and not vanishing into it. This single habit, applying and checking eyes-open, fixes more hooded-eye frustration than any single product.
Find where the hood folds with your eyes open and set your "new crease" just above it, because that line is what every later step is built on.
The Placement That Lifts and Opens
Now you place color, working from that mapped line. The sequence below is the standard light-to-dark order, lifted higher than usual. For the general logic of each zone, see our full guide to where to place each shade; here we focus only on the hooded-specific adjustments.
- Prime past the hood. Sweep eyeshadow primer across the whole mobile lid and up past your mapped line into the area above the fold. On hooded eyes that upper strip is exactly where your shadow needs to grip, so do not stop priming at the visible lid.
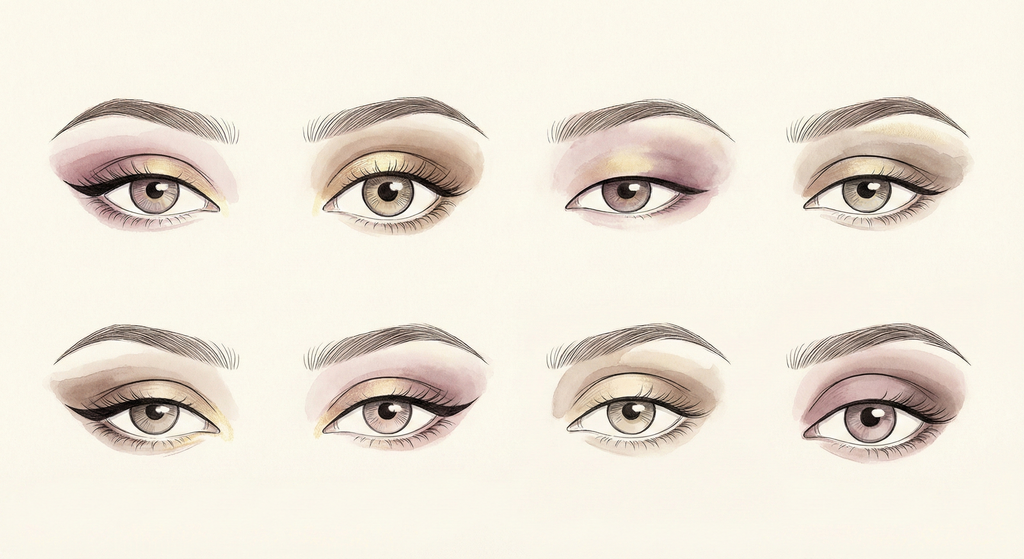
- Float the matte mid-tone above the hood. Take a soft matte mid-tone and, with your eyes open, lay it in a gentle "floating crease" along the line you mapped, just above where the fold sits. Use windshield-wiper strokes and keep it slightly higher at the outer corner. This floated band is the heart of the look, because it reads as depth and dimension even when the real crease is folded away.
- Deepen a small outer wedge. With a deeper matte shade, press a compact wedge at the outer corner and blend it up and in toward your floated crease. Keep it tight and angled slightly upward. A small lifted wedge pulls the eye open; a big smudge that follows the lower lash line drags it down.
- Keep the visible lid light. Pat a light satin or soft shimmer onto the center of the small visible lid. This is the one spot shimmer belongs. The brightness on the lid catches light and makes the limited space look fuller.
- Add an inner-corner pop. Press a touch of light shimmer or a satin shade into the inner corner to open the eye and balance the outer depth.
Blend everything up and out, never down. Downward blending follows the hood and closes the eye; upward-and-outward blending lifts it. Stand back from the mirror with your eyes open and check the silhouette: you should see a soft gradient sitting above the fold, not a band hiding inside it.
Float the matte mid-tone above the hood and blend up and out, so the definition stays visible and the eye reads as lifted rather than weighed down.
Choosing Shades That Show Up, and Suit You
Two finish rules do the heavy lifting on hooded eyes. First, matte mid-tones create the visible structure, because matte reads as true shadow and holds its shape above the fold. Second, keep shimmer to the lid center and inner corner only. Shimmer on the hood itself catches light across the fold and emphasizes exactly the area you are trying to play down, so it works against you everywhere except that small flat lid.
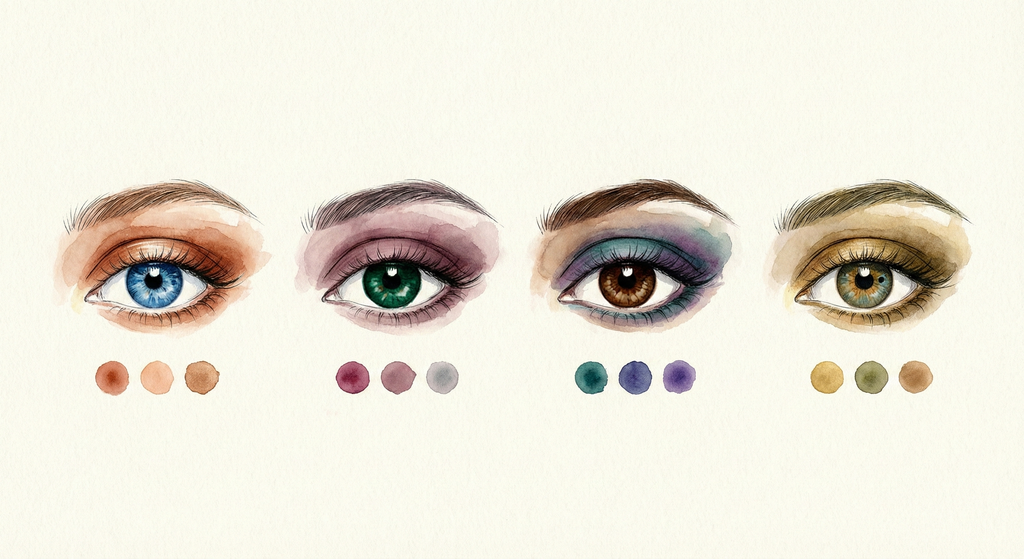
Within those rules, the shades that flatter most are the ones that match your coloring. The trick is to choose your mid-tone and your accent from one temperature family, warm with warm or cool with cool, never a mix. A temperature-coherent pair looks intentional and harmonizes with your features; a warm crease under a cool accent looks muddy and at odds with your skin. Pick the family that matches your color season, then build the look from it.
If you lean warm (any Spring or Autumn season), a soft golden taupe mid-tone with a warm bronze accent gives you visible lift without going ashy:
Warm seasons (Spring and Autumn) Palette
Best Colors
If you lean cool (any Summer or Winter season), a cool taupe mid-tone with a soft plum accent keeps the same lifting structure in a temperature that suits you:
Cool seasons (Summer and Winter) Palette
Best Colors
Not sure which family is yours? Your color season is the reliable way to settle it, and you can confirm the shades for your eye color once you know your temperature. A quick guardrail: keep the whole eye in one temperature, and let the matte mid-tone, not the shimmer, do the lifting.
Let matte mid-tones build the lift and keep shimmer to the lid center, then choose your mid-tone and accent in one temperature family that matches your season.
Discover Your Perfect Eye Look
Get your first AI-personalized look in under 5 minutes.


Eyeliner for Hooded Eyes
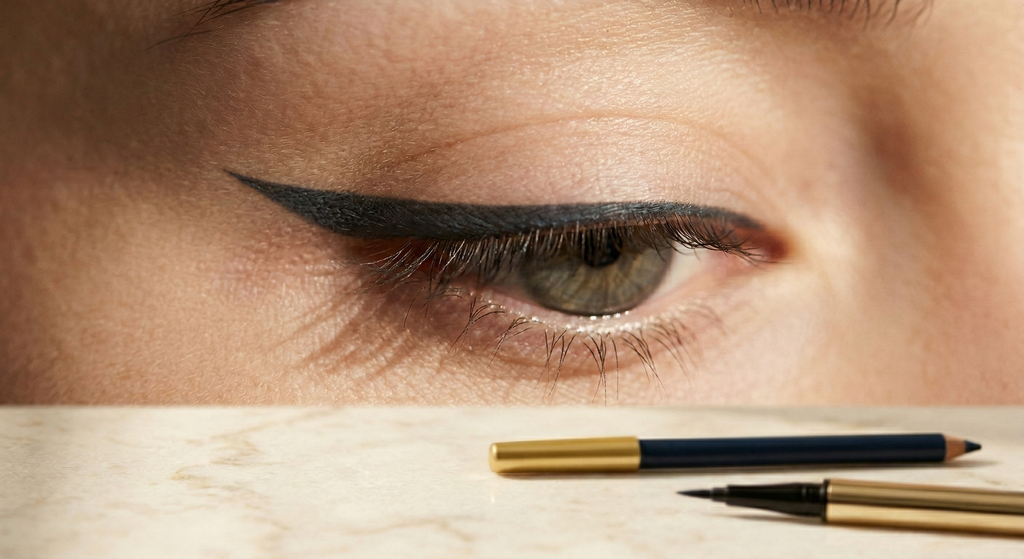
Liner is where hooded eyes get sabotaged most often, because a thick line is precisely what the fold swallows. Keep the line thin and pressed right into the lash roots through the inner two-thirds of the eye. A skinny line hugging the lashes defines them without eating into the small lid space you have.
Tightline the upper waterline too. Running a waterproof pencil along the strip at the base of your top lashes adds density and depth without taking up any visible lid, so your lashes look thicker and your eyes look defined even when the lid is mostly hidden. It is the single most flattering liner move for this shape.
If you want a wing, map it with your eyes open. Look straight ahead, find where the hood ends, and start the flick above that point so it clears the fold; place a small dot where you want the wing to finish and connect to it. A wing drawn eyes-closed, or one that follows the lower lash line outward, tucks under the hood and points down the moment you open your eyes, which reads as droopy and smudges through the day. For the full method and how it shifts across shapes, see our guide to liner for your eye shape.
Keep liner thin and close to the lashes, tightline the upper waterline, and start any wing above where the hood folds so it stays visible.
Mascara and Brows
Lashes frame the opening, so lift them rather than load them. Curl your upper lashes first, then apply a wispy, separated coat of mascara, wiggling the wand at the roots and sweeping up and out. Heavy, clumpy lashes add weight at the lash line and can drag a hooded eye downward, while lifted, fanned lashes hold the eye open. A light hand on the lower lashes keeps the focus up top where you want it.
Brows matter more than people expect here. A gently lifted, well-groomed brow gives the socket more open space to breathe above the hood. You are not aiming for a dramatic arch, just brushing the hairs up and out and keeping the underside clean so the area between brow and lid stays light. That clean, slightly lifted line makes the whole eye look more awake.
Lift and separate lashes rather than loading them, and keep brows groomed and gently lifted to give the eye more open space.
Tools That Make Hooded Eyes Easier
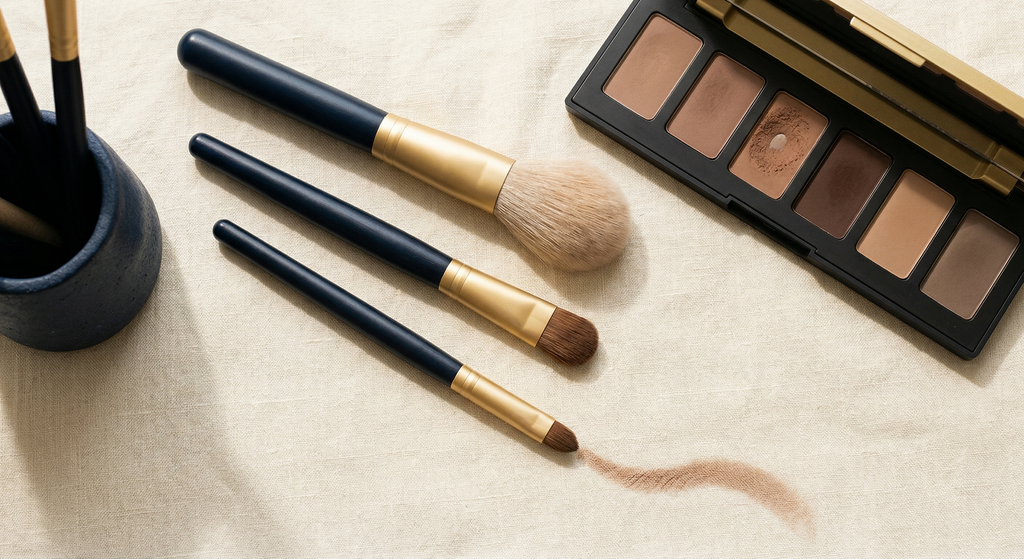
You do not need new tools for hooded eyes, you need control in a small area. Two brushes carry most of the work. A small, dense blending brush lets you place and diffuse the floated crease precisely without flooding color down onto the lid; a full-size fluffy brush is too broad for the narrow strip above the hood and tends to drag shadow into the fold.
The second is a small pencil or crease brush for the outer wedge and any detailed deepening, plus a fine angled brush if you prefer to set your liner with shadow rather than pencil. Precision beats size on a hooded eye, because every millimeter of placement shows. For the core kit and what each shape does, see our breakdown of a small blending brush and the rest of the essentials.
A small dense blending brush and a precise pencil or crease brush give you the control a hooded eye needs in a tight space.
Common Hooded-Eye Mistakes
Most hooded-eye disappointment traces back to a short list of habits. Fix these and the look changes immediately.
- Applying with your eyes closed. The number one mistake. Everything you place on relaxed skin folds away when you open your eyes. Apply and check eyes-open.
- Shimmer on the hood. Shimmer above the lid catches light across the fold and pushes it forward, emphasizing the very area you want to soften. Keep shimmer to the lid center and inner corner.
- Crease color placed too low. Color blended into the real socket line disappears under the hood. Float it above the fold along your mapped line instead.
- Liner too thick. A heavy line gets swallowed by the fold and can close the eye. Keep it thin and tightline the upper waterline for definition.
- Blending downward. Pulling color down follows the hood and drags the eye. Always blend up and out.
Most hooded-eye mistakes come from applying eyes-closed, shimmer on the hood, low crease placement, and thick liner, and each one has a simple fix.
Quick-Reference Placement Map
| Eye zone | Shade and finish | What it achieves |
|---|---|---|
| Visible lid | Light satin or soft shimmer | Catches light and makes the small lid look fuller |
| Above the hood | Matte mid-tone (the "floating crease") | Creates visible depth that stays put when eyes are open |
| Outer wedge | Deeper matte, blended up and in | Lifts and opens the outer corner |
| Inner corner | Light shimmer or satin | Brightens and balances the outer depth |
| Upper waterline | Waterproof pencil (tightline) | Adds definition without using lid space |
Map each zone to a finish: matte for the lifting structure above the hood, light shimmer only on the lid and inner corner, and a tightlined waterline for definition.
Frequently Asked Questions